
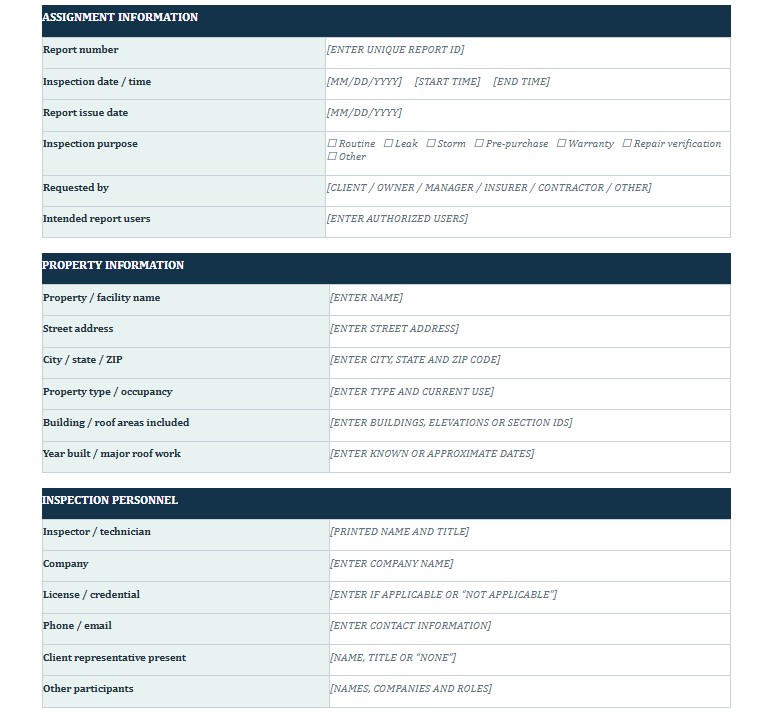
A Roofing Inspection Report is used to document the visible condition of a residential, commercial, or industrial roofing system. Roofing contractors, home inspectors, property managers, facility professionals, insurance representatives, consultants, and building owners may use the report to record roof materials, inspection methods, observed defects, moisture indicators, drainage conditions, safety concerns, photographs, and recommended corrective actions. A well-organized report creates a traceable record that can support preventive maintenance, repair planning, real estate evaluations, warranty reviews, storm assessments, and contractor communication. This page provides downloadable Word, PDF, and Excel versions of the Roofing Inspection Report, together with practical guidance for completing and using the document. The Word version can be customized for a particular property or inspection scope, the PDF version provides a consistent format for distribution and recordkeeping, and the Excel version is useful for tracking findings, repair priorities, estimated costs, responsible parties, completion dates, and recurring inspections across multiple roof areas.
Download the Roofing Inspection Report Word Template
The Word format is useful when the inspector, contractor, or property manager wants to edit the report freely before printing, sharing, signing, or adapting it to a specific roof system, building type, company procedure, client requirement, or inspection assignment.

Download the Roofing Inspection Report PDF Template
The PDF format is useful for printing, archiving, emailing, signing, or distributing a fixed-layout version of the report. It can help preserve the approved wording, photographs, findings, and recommendations when the document is viewed on different devices.
Download the Roofing Inspection Report Excel Template
The Excel format is useful for organizing repeatable inspection rows, roof sections, measurements, condition ratings, finding numbers, dates, repair priorities, estimated dollar amounts, responsible contractors, photographs, maintenance schedules, and follow-up records. It is particularly useful for facilities with multiple buildings or roof areas.
How to Complete and Use This Document
Start by entering the inspection identification data. Include the report number, inspection date, property address, building name, owner or client, inspector’s name, company information, and the reason for the inspection. The purpose may be routine maintenance, leak investigation, storm assessment, real estate due diligence, warranty review, repair verification, or evaluation before roof replacement. Identify each roof section separately when a property contains different elevations, materials, installation dates, slopes, or drainage systems.
Define the scope and inspection method before recording conclusions. State whether observations were made from the ground, roof edge, ladder, drone, interior, attic, roof surface, or a combination of locations. Describe inaccessible or concealed areas and explain why they were not inspected. Weather, wet surfaces, snow, ice, excessive heat, steep slopes, fragile materials, electrical hazards, damaged decking, or missing fall-protection arrangements may limit safe access. An inspection report should never imply that an area was examined when it was not safely accessible.
Record the roof profile, including the roof configuration, approximate area, slope or pitch, deck or substrate, roofing material, manufacturer when known, approximate age, installation history, number of layers, drainage method, and available warranty information. Common systems include asphalt shingles, metal panels, tile, slate, wood shakes, built-up roofing, modified bitumen, EPDM, TPO, PVC, spray foam, and liquid-applied coatings. The inspection criteria should be adapted to the system because relevant defects differ by material and installation type.
Document the condition of the roof covering objectively. For steep-slope roofing, observations may include missing, cracked, curled, displaced, punctured, weathered, or improperly fastened units. For low-slope systems, note open seams, punctures, wrinkles, blisters, shrinkage, coating loss, exposed reinforcement, failed patches, or areas of ponding water. Avoid vague statements such as “roof is bad.” Describe the defect, its location, approximate size, visible severity, and available evidence.
Inspect visible flashing and penetrations carefully. The report should address valleys, roof-to-wall transitions, chimneys, skylights, plumbing vents, exhaust outlets, roof drains, curbs, hatches, parapets, expansion joints, edge metal, equipment supports, solar mounts, and abandoned penetrations. Record open joints, corrosion, failed sealant, loose components, inadequate water-shedding details, or temporary repairs that require professional correction.
Evaluate gutters, downspouts, internal drains, scuppers, overflow provisions, and drainage paths. Note debris, blockages, damaged components, erosion, water staining, low areas, or standing water. Where accessible, examine the attic, ceilings, walls, insulation, and underside of the roof deck for active dripping, stains, damp materials, daylight, corrosion, condensation, mold-like growth, deterioration, or structural movement. Moisture indicators do not always identify the exact source, so avoid stating a cause as certain unless supported by appropriate testing or professional analysis.
Assign a unique finding number to each deficiency and connect it to photographs, roof-plan locations, measurements, and recommended actions. Classify findings using a consistent priority system, such as routine maintenance, monitor, repair recommended, urgent action, or specialist evaluation. State whether temporary protection is needed and identify the recommended responsible party. Do not present a preliminary repair estimate as a guaranteed price unless it is supported by an authorized proposal.
Include photographs that show an overview, the exact location, and a close view of the defect when practical. Label each image with the date, roof section, direction, and corresponding finding number. Supporting documents may include roof plans, prior reports, repair invoices, moisture-test results, manufacturer information, warranty certificates, and contractor proposals.
Complete the summary with the overall observed condition, immediate safety concerns, recommended maintenance, repair priorities, and suggested follow-up date. The inspector should sign and date the report, and the organization may require technical review or client acknowledgment. A signature identifies who prepared or received the document, but it does not automatically convert a visual report into a roof certification, engineering opinion, code-compliance determination, insurance coverage decision, warranty approval, or guarantee of remaining service life.
Licensing rules, inspection standards, disclosure duties, building codes, insurance procedures, and recordkeeping requirements may vary by state, county, city, contract, and industry. Consult a qualified roofing contractor, licensed inspector, architect, structural engineer, attorney, insurer, manufacturer, or local authority when the report will be used for a legal dispute, insurance claim, property transaction, structural decision, warranty matter, or regulatory purpose. Retain the final report with photographs, correspondence, repair records, invoices, permits, warranties, and verification documents so future inspections can be compared with the original findings.