
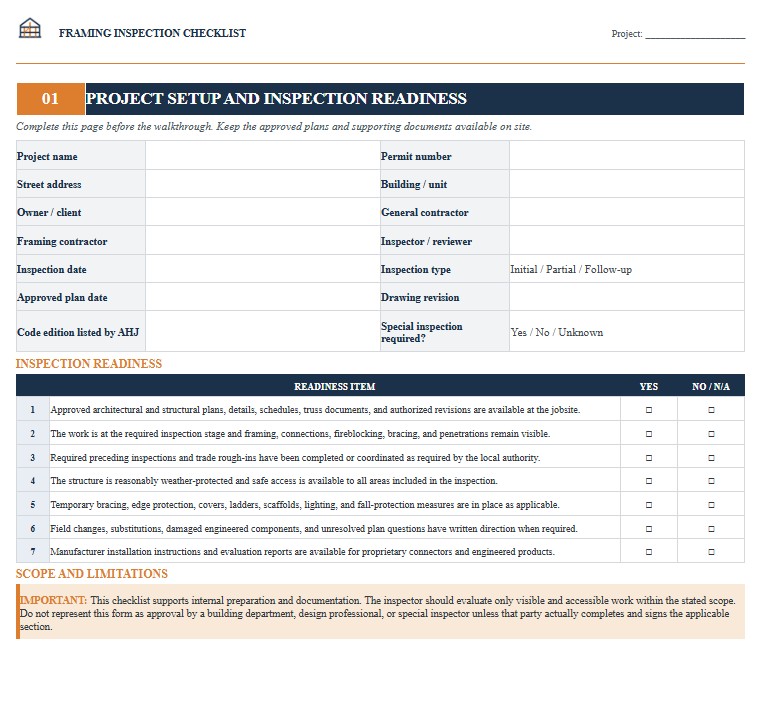
A Framing Inspection Checklist is a practical construction record used to review structural framing before walls, ceilings, and other concealed areas are covered. Builders, general contractors, framing contractors, project managers, property owners, architects, engineers, and construction inspectors can use the checklist to confirm that visible work has been compared with the approved plans and prepared for an official inspection. Typical review areas include permits and drawings, floor systems, wall framing, roof framing, structural connections, sheathing, bracing, fireblocking, openings, stairs, and penetrations made for building systems. This page provides downloadable Word, PDF, and Excel versions of the Framing Inspection Checklist, together with practical guidance for completing and using the document. The template can support internal quality control and correction tracking, but it does not replace an inspection performed by the local building department, an approved special inspector, or a licensed design professional when one is required.
Download the Framing Inspection Checklist Word Template
The Word format is useful when you want to edit inspection categories, add company branding, include project-specific structural details, revise approval fields, or adapt the checklist before printing, sharing, signing, or submitting it as part of an internal construction record.

Download the Framing Inspection Checklist PDF Template
The PDF format provides a consistent fixed layout that is convenient for printing at the jobsite, sharing with contractors, attaching to inspection documentation, marking during a walkthrough, or archiving with permits, plans, photographs, and correction notices.
Download the Framing Inspection Checklist Excel Template
The Excel format is useful for managing repeatable inspection rows, recording dates and locations, assigning corrective work, filtering deficiencies by status or priority, tracking reinspection items, and maintaining a structured framing quality-control log across multiple buildings, floors, units, or construction phases.
How to Complete and Use This Document
Begin by recording enough project information to connect the checklist with the correct permit and approved construction documents. Typical fields include the project name, street address, building or unit number, permit number, owner, general contractor, framing contractor, inspector or reviewer, inspection date, inspection type, applicable drawing revision, and relevant code edition. Indicate whether the checklist is being used for an internal quality-control review, an initial inspection, a partial inspection, or a follow-up inspection. Keep the approved plans, structural details, truss documents, engineering letters, and authorized revisions available during the walkthrough.
Confirm that the project is at the proper stage before beginning the review. Framing is generally inspected while structural components, connections, fireblocking, draftstopping, bracing, pipes, ducts, vents, and other work that will later be concealed remain visible. The required inspection sequence varies by jurisdiction. Rough electrical, plumbing, mechanical, gas, fire sprinkler, or other trade inspections may need to be completed before the framing inspection is requested. Do not cover work until the appropriate authority has approved it.
Review the structure systematically, beginning with anchorage and the load path. Check visible anchor bolts, straps, hold-downs, post bases, bearing points, beams, headers, joists, studs, rafters, trusses, blocking, and connectors against the approved plans. Record member size, spacing, location, bearing, fastening, and connection concerns. Note missing hardware, damaged lumber, unsupported joints, inadequate bearing, improper substitutions, or field changes that do not appear on the approved drawings. Engineered beams, trusses, shear walls, diaphragms, and proprietary connectors should be installed in accordance with the approved design and manufacturer documentation.
Inspect floor framing for alignment, bearing, lateral support, blocking, rim or band members, hangers, fastening, and sheathing attachment. Document excessive cutting, drilling, or notching of joists, beams, studs, plates, rafters, and engineered wood products. Openings created for plumbing, wiring, ducts, or other systems should not reduce structural capacity beyond what is permitted by the applicable design or product instructions. Questionable alterations should be referred to the building official, engineer, architect, truss designer, or manufacturer rather than accepted through an informal field judgment.
For wall framing, check stud size and spacing, top and bottom plates, corners, intersections, headers, jack studs, king studs, cripple studs, posts, wall bracing, sheathing, fastening patterns, and connections to floors and roofs. Compare door and window openings with the drawings. Record changes in opening size or location, particularly when they affect headers, braced wall panels, shear walls, concentrated loads, emergency escape openings, or required fire separation. Verify that structural panels and approved connectors are installed in the locations and orientations shown on the plans.
Review roof and ceiling framing for proper member placement, bearing, ties, blocking, bracing, hangers, connections, and sheathing. Trusses should be checked for visible damage, unauthorized cutting or drilling, required permanent bracing, and consistency with the approved truss package. Any altered or damaged truss normally requires written repair information from an authorized design professional or truss representative. Record attic access framing, roof openings, chimney clearances, and concentrated loads when they fall within the project scope.
Fire and life-safety items should receive a separate review. Document fireblocking, draftstopping, concealed spaces, penetrations, garage separation framing, dwelling-unit separation assemblies, stairs, landings, guards, required headroom, and framed openings for smoke or carbon monoxide alarms when applicable. Rated assemblies and penetrations must match their approved details. Requirements can differ substantially by occupancy, property-line distance, construction type, sprinkler status, and local amendments.
Use a consistent result for each line, such as approved, acceptable, correction required, not inspected, or not applicable. Describe deficiencies precisely by identifying the building area, floor, room, grid line, wall, framing member, plan detail, and required follow-up. Attach dated photographs, sketches, correction notices, engineer letters, product data, or revised drawings where useful. Assign each corrective action to a responsible contractor and include its priority, target date, completion date, and verification status.
Before requesting an official inspection, review the checklist for incomplete work, inaccessible areas, missing plans, unapproved revisions, concealed connections, debris, unsafe access, and unresolved corrections. The contractor or responsible reviewer should sign and date the completed record. Retain it with inspection reports, permit documents, approved plans, change orders, special-inspection reports, photographs, invoices, and closeout records.
This template is a preparation and documentation tool, not evidence that construction complies with every applicable requirement. Building codes, adopted editions, amendments, inspection procedures, and required professional approvals vary among states, counties, cities, and project types. Customize the checklist to the approved plans and local inspection requirements. Consult the building department or a qualified contractor, architect, structural engineer, special inspector, or other licensed professional when structural damage, plan deviations, engineered components, unusual loading, high-wind or seismic design, fire-resistance construction, or uncertain code conditions are involved.