
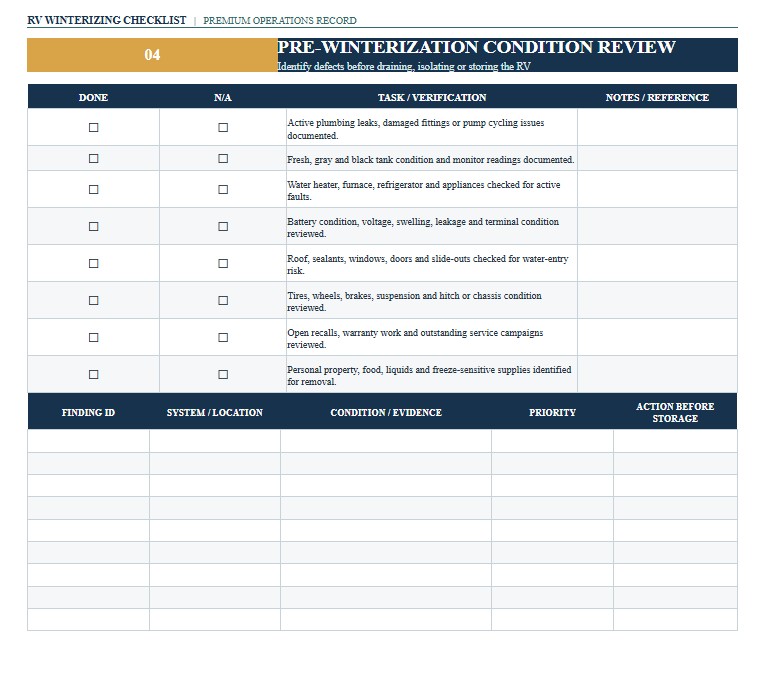
An RV Winterizing Checklist provides a structured way to prepare a motorhome, travel trailer, fifth wheel, camper van, truck camper, or toy hauler for freezing temperatures and seasonal storage. RV owners, rental operators, storage facilities, dealers, and service technicians can use the checklist to document plumbing protection, tank drainage, water-heater preparation, battery care, tire checks, appliance shutdown, exterior inspection, pest prevention, and storage conditions. Proper winterization can reduce the risk of cracked fittings, damaged pumps, frozen valves, water-heater problems, battery deterioration, moisture damage, and costly spring repairs. This page provides downloadable Word, PDF, and Excel versions of the RV Winterizing Checklist, together with practical guidance for completing and using the document. The Word version supports customization, the PDF version provides a consistent printable record, and the Excel version is useful for tracking tasks, supplies, dates, costs, responsible persons, service providers, photographs, and spring recommissioning activities.
Download the RV Winterizing Checklist Word Template
The Word format is useful when an RV owner, service technician, dealer, rental operator, or storage facility wants to edit the checklist freely before printing, sharing, signing, or adapting it to a particular RV model, plumbing configuration, climate, storage method, or company procedure.

Download the RV Winterizing Checklist PDF Template
The PDF format is useful for printing, archiving, sharing, or keeping a fixed-layout winterization record with the RV manuals, service history, storage agreement, warranty documents, and spring startup instructions.
Download the RV Winterizing Checklist Excel Template
The Excel format is useful for tracking repeatable winterization tasks, antifreeze and supply quantities, service dates, costs, storage inspections, battery readings, tire pressures, responsible technicians, completion status, corrective actions, and spring dewinterization activities.
How to Complete and Use This Document
Begin by identifying the recreational vehicle and the winterization assignment. Enter the manufacturer, model, model year, RV type, vehicle identification number, license plate, mileage, generator hours, owner or operator, storage location, winterization date, and person responsible for the work. Record the expected storage period, anticipated minimum temperature, whether the RV will remain heated, and whether it may be used during the winter.
Review the current owner manual and the instructions for the water heater, water pump, refrigerator, washing machine, dishwasher, ice maker, hydronic system, generator, batteries, chassis, and other installed equipment. Plumbing layouts and valve positions differ significantly among RVs. Do not assume that a procedure used on another motorhome or trailer is correct for the vehicle being winterized.
Document the plumbing method before beginning. Common approaches involve draining the system, using compressed air according to the manufacturer’s limits, circulating non-toxic RV or marine antifreeze through the potable-water lines, or combining approved procedures. Use only antifreeze specifically intended for RV potable-water systems. Automotive engine antifreeze is not an acceptable substitute.
Turn off the water heater and allow it to cool completely before draining or servicing it. Disconnect outside water, switch off the water pump, relieve system pressure, and follow the appliance manufacturer’s instructions. Record whether the water heater was drained, inspected, and placed in bypass mode. Tankless and hydronic water-heating systems may require model-specific procedures, so refer specialized equipment to a qualified technician when the instructions are unclear.
Drain and clean the black-water and gray-water systems at an authorized facility, then drain the fresh-water tank and low-point drains. Record the status of tank valves, caps, rinse equipment, macerators, filters, outside showers, spray ports, and other water-bearing accessories. Disposal practices and storage-facility rules can vary by location, so verify applicable state, county, city, campground, and facility requirements.
When RV antifreeze is used, document the product, quantity, date, and method. Follow the manufacturer’s valve sequence and pump instructions. Operate each hot and cold faucet separately until the approved winterization fluid reaches the outlet, including the kitchen sink, bathroom sink, shower, outside shower, toilet, and any secondary fixtures. Include appliances and accessories such as washing machines, dishwashers, refrigerator water lines, ice makers, filters, and low-point fixtures only according to their specific instructions.
Protect drains and traps as directed by the RV manufacturer. Record whether sink drains, shower drains, toilet seals, waste valves, and other required locations received the appropriate protection. Do not pour chemicals into a system unless the product is compatible with the plumbing materials, seals, tanks, and manufacturer instructions.
Use separate sections for the electrical system and batteries. Record battery type, voltage, state of charge, disconnect position, charger or maintainer settings, storage temperature, and inspection schedule. Flooded lead-acid, AGM, and lithium batteries can require different charging, temperature, and storage procedures. Follow the battery and RV manufacturer’s instructions, particularly for lithium batteries that may have low-temperature charging restrictions.
For motorized RVs, document chassis fluid levels, fuel stabilization when recommended, tire pressure, parking-brake strategy, engine-battery care, and any scheduled winter operation. Track generator hours and record the manufacturer-approved storage procedure, fuel treatment, oil service, battery care, exhaust inspection, and future exercise schedule. Do not run an engine or generator in an enclosed storage area.
Inspect the roof, seams, sealants, vents, skylights, windows, doors, slide-outs, awnings, compartments, underbody, and exterior accessories before storage. Record active leaks, cracked sealant, damaged covers, loose components, or repairs that must be completed before winter weather. Roof access presents a fall hazard, so use a safe inspection method or a qualified RV service provider.
Record the cold inflation pressure, visible condition, position, and date code of each tire. Follow the RV and tire manufacturer’s storage recommendations concerning inflation, loading, covers, supporting surfaces, and periodic inspection. Do not lift or support the RV at unapproved points.
Remove food, beverages, trash, and products that can freeze, leak, attract pests, or create odors. Clean the refrigerator and freezer, follow the manufacturer’s shutdown instructions, and document whether doors were secured in the recommended ventilation position. Inspect for moisture, open leaks, pest entry points, and combustible materials. Use pest-control products cautiously and in accordance with label instructions.
Complete the propane section without representing a visual check as a professional leak or pressure test. Record cylinder or tank condition, valve position, mounting, regulator protection, appliance shutdown, and storage-facility restrictions. Propane diagnosis, pressure testing, leak testing, regulator service, and repairs should be performed by qualified personnel.
Finish the checklist with unresolved defects, corrective actions, photographs, supply receipts, technician information, signatures, and the planned spring dewinterization date. Attach a visible winterized notice identifying the date and systems protected. Retain the completed record with the manuals, invoices, warranty documents, storage agreement, and insurance records. Consult a qualified RV technician, electrician, propane professional, chassis mechanic, battery specialist, or storage operator whenever the procedure involves unfamiliar equipment, energized components, structural damage, active leaks, safety-critical systems, or uncertain manufacturer requirements.